グリッドレイアウト [compass]

最近よく言われるデザインパターンに「グリッドレイアウト」というものがあります。その名の通り規則正しい「グリッド」を想定し、それに添ってレイアウトデザインを行うという手法です。別に新しい考え方というわけではなく、エディトリアルデザインでは一般的な考え方なのですが、Webデザインの世界でも良く聞くようになりました。「フラットデザイン」もそうですが、派手なグラフィックでゴテゴテと飾り立てるデザインではなく、「情報を機能的に見せる」デザインパターンにシフトしてきているのかもしれません。さてこのグリッドレイアウトを簡単に実現するために、いくつかのcssフレームワークが開発されています。「960 Grid System」が有名ですが、compassではBlueprintというフレームワークを統合しています。ここではその使い方を説明します。
Blueprintを使う準備
> compass create --using blueprint

> compass install blueprint

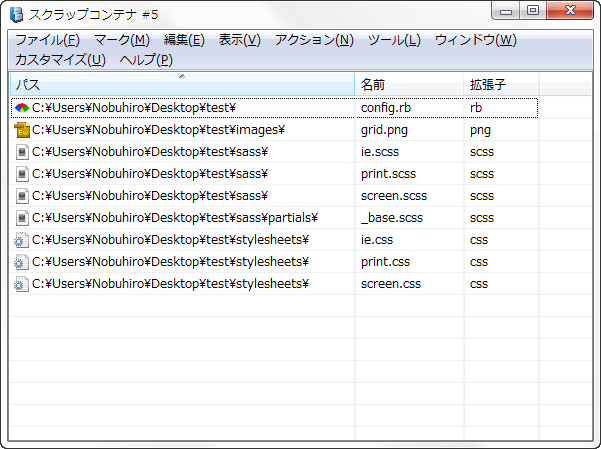
コマンドを実行するといくつかの初期フォルダとファイルが追加されます。
- images/grid.png:デバッグ用のグリッド背景を表示するための画像です。
- sass/partials/_base.scss:Blueprint用の基本的な定数を定義するファイル。グリッドの大きさなどを定義します。
- sass/中のファイルはBlueprint用の初期コードを含んでいます。
グリッドの幅を決める
グリッドの幅は_base.scssで定義されています。
// Here is where you can define your constants for your application and to configure the blueprint framework.
// Feel free to delete these if you want keep the defaults:

$blueprint-grid-columns: 24; // グリッド数
$blueprint-container-size: 950px; // コンテナの横幅(固定レイアウトのみ)
$blueprint-grid-margin: 10px; // グリッド間のマージン

// Use this to calculate the width based on the total width.
// Or you can set $blueprint-grid-width to a fixed value and unset $blueprint-container-size
// -- it will be calculated for you.
$blueprint-grid-width:
  ($blueprint-container-size + $blueprint-grid-margin) / $blueprint-grid-columns - $blueprint-grid-margin;
  // この行は変更しない
デフォルトではページの幅が$blueprint-container-size: 950px、グリッド数 $blueprint-grid-columns: 24、グリッド間のマージン $blueprint-grid-margin: 10pxとなっています。それぞれの値を編集してサイトデザインを定義してください。これらの値を元に10行目の式でグリッド幅を計算していますので、10行目を変更してはいけません。
編集するとは言っても、グリッド幅のピクセル数に端数が出てしまうと、きちんとしたレイアウトが行われません。きれいな整数になるように調整をしてください。
Blueprintの初期状態ではリキッドレイアウトにすることはできません。リキッドレイアウトを実現する方法は後で説明をします。
Blueprintフレームワークの初期化
01: // This import applies a global reset to any page that imports this stylesheet.
02: @import "blueprint/reset"; // cssリセット
03: // To configure blueprint, edit the partials/base.sass file.
04: @import "partials/base"; // 定義した定数の取り込み
05: // Import all the default blueprint modules so that we can access their mixins.
06: @import "blueprint"; // Blueprintの初期化
07: // Import the non-default scaffolding module.
08: @import "blueprint/scaffolding"; // 「足場」の構築。削除してもかまいません
なお11行目でインポートされているblueprint/scaffoldingは「初期状態の見栄えを整える」と説明されていますが、最終的には不要なものです。この行は削除してかまいません。
screen.scssにはさらに数行が含まれていますが、コード例のようなものですので、削除する方がいいと思います。
グリッドを定義する
<!-- 3,18,3に分割されたグリッド -->
<div class=”container”>
  <div class=”span-3”>Left side</div>
  <div class=”span-18”>Center</div>
  <div class=”span-3 last”>Right side</div>
</div>
全体を包むコンテナにはcontainerクラスを指定します。また最後のカラムにはlastを指定します。ともに必須ですので注意してください。
クラスを使わないBlueprintの使い方
HTMLコードにクラスを指定していく方法は簡単ですが、CMSのようにHTMLコードを編集できないときには使うことができません。この場合はクラスを定義するときにカラム幅を指定する必要があります。
そのためにはまず、プロジェクトをつくるときに
> compass create --using blueprint/semantic
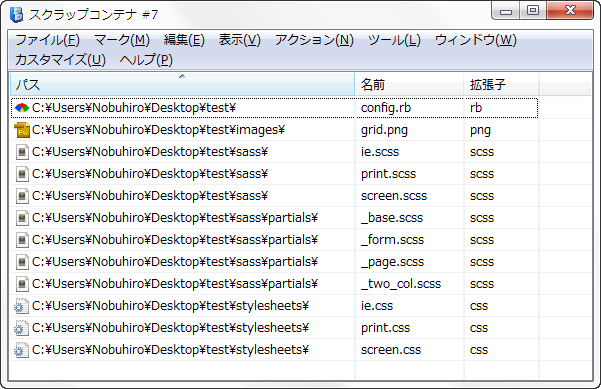
とします。作成される初期ファイルがさきほどより増えます。

- _base.scss:グリッド幅を設定しています_page.scss 全スタイルシートに共通する基本定義です。初期ファイルの内容はサンプルなので、削除して必要な定義に置き換えます。
- _form.scss:フォーム関連の定義です。不要であれば削除してかまいません。
- _two_cols.scss:サンプルです。これも削除してかまいません。
パーシャルを削除したときはscreen.scssのインポート指定も一緒に削除してください。
<!-- HTML -->
<div class=”wrapper”>
  <div class=”left-column”>Left side</div>
  <div class=”center-column”>Center</div>
  <div class=”right-column”>Right side</div>
</div>

// sass
$center-column-width: 18;
$left-column-width: ($blueprint-grid-columns - $center-column-width) / 2; // ここでは中央のカラムに基づいて左右のカラム幅を計算
$right-column-width: ($blueprint-grid-columns - $center-column-width) / 2;
.wrapper {
  @include container;
  .left-column {
    @include column($left-column-width);
  }
  .center-column {
    @include column($center-column-width);
  }
  .right-column {
    @include column($right-column-width, true);
  }
}
全体をラップするクラス(.wrapper)には@include containerが必要です。また最後のカラム(.right-column)の第2引数にtrueが指定されていることに注意してください。(.lastクラスと同じ意味を持ちます。)
リキッドなグリッドシステム
Blueprintにはリキッドレイアウトのパターンも用意されています。これを使うには次のようにコードを変更します。
_base.scssは次のようになります。
$blueprint-grid-columns: 6; // 固定レイアウト時の定数:なくてもかまいません
$blueprint-container-size: 920px;
$blueprint-grid-margin: 40px;
// リキッドグリッドの設定
$blueprint-liquid-grid-columns: $blueprint-grid-columns; // 固定レイアウト時の定数を元に%値を計算
$blueprint-liquid-grid-margin: percentage($blueprint-grid-margin / $blueprint-container-size);
$blueprint-liquid-container-width: 100%;
$blueprint-liquid-grid-width: ($blueprint-liquid-container-width + $blueprint-liquid-grid-margin) / $blueprint-liquid-grid-columns - $blueprint-liquid-grid-margin;
$blueprint-liquid-container-min-width: $blueprint-container-size; // モバイルなど画面幅が小さいときには注意
モバイルなど画面幅が小さいときに$blueprint-liquid-container-min-widthの定義がじゃまになる場合があります。状況に応じて適宜設定をしてください。
また各スタイルシートの冒頭では、次のようにしてBlueprintを初期化します。
@import "blueprint/reset";
// blueprintの設定
@import "partials/base";
// blueprintモジュールの読み込み
@import "blueprint";
@import "blueprint/liquid"; // blueprintに続いて、blueprint/liquidをインポートします
// Blueprintのセットアップ
@include blueprint-liquid-grid; // blueprintの代わりにblueprint-liquid-gridをインクルードして、blueprintをリキッドデザイン用に初期化します
グリッドを設定するクラスやミックスインの使い方は通常のblueprintと同じです。詳しいことは公式ドキュメントをご覧ください。
デバッグ用の設定
制作中の段階では正しいグリッドレイアウトが実現できているかどうか確認する手段が必要です。compassでは背景にグリッドを表示することで容易に確認をすることができます。
.container {
  @include showgrid;
}
グリッド全体をラップするコンテナクラスをこのように設定すれば、背景に縦横のグリッドが表示されるようになります。
グリッドは_base.scssなどで設定された値に基づいて計算されますが、グリッド用の画像を使うこともできます。そのときには
@include showgrid('grid.png');
にように画像ファイルを指定してください。
縦方向のグリッド(行間)は$blueprint-font-size * 1.5 となっています。行間のコントロールをVertical Rhythmでおこなうと違う値になることもありますが、そのときには$blueprint-font-sizeを適宜調整してください。

 Web開発のとき統合開発環境としてEclipse(あるいはAptanaStudio)を使用している人は多いでしょう。ここではEclipseのビルドシステムを使ってcompassをコンパイルする方法を説明します。
 最近のWebデザインではメディアクエリを使用したレスポンシブデザインが必須となっています。sassでももちろんメディアクエリはサポートされています。sassならではの拡張がされているので複雑になりがちなメディアクエリもスッキリと書けるようになります。
 cssでは背景に画像を指定することが良くあります。普通はbackground-image: url(../images/bg.png); のように書くことでしょう。しかしこの方法ではフォルダレイアウトを変更すると、すべての指定を書き換えなければなりませんし、CMSではこのような相対指定が使えない場合もあります。このような不便を解消するためにcompassでは画像を特別な方法であつかいます。
 横方向のレイアウト整合性をとるのがBlueprintなら、縦方向(行間)をコントロールするのがVertical Rhythmです。Blueprintにも行間コントロールの機能はあるのですがあまり使いやすいとは言えません。ここではcompassコアに含まれるVertical Rhythmの使い方を説明します。
 compassの魅力のひとつは豊富で実績のあるミックスインが使えることです。ここではcompassコアに含まれるミックスインの概要を紹介します。
 sassは従来のcssと互換性のあるスタイルシート言語です。実際、cssファイルの拡張子をscssに変えただけでも立派なsassソースファイルであり、コンパイルをすることができます。なのでcssについての知識があればsassは簡単に覚えることができます。ここではその概要を説明します。
 compassを利用するにはまずcompassコンパイラをインストールする必要があります。ここではWindows環境にcompassをインストールする方法と、基本的な利用方法について説明をします。
 Webページを作成するとき、作業の半分はグラフィックの制作に、残りの半分はCSSの制作に費やされるでしょう。CSSの制作環境は数年前と比べて格段に良くなっているとはいえ、CSSという言語自体はそれほど進歩していません。特にDrupalなどのCMSプロジェクトではセレクタの記述がどんどん長くなる傾向にあり、そのためcssコードの共有や保守がますます難しくなってきています。